It’s generally accepted that using any sort of stateful load-balancer in front of a set of DNS servers is a bad idea. There are several reasons for this, but my favourites are that:
- it means adding an unnecessary potential point of failure
- the state engines in load-balancers aren’t scaled for DNS, and will be the first thing to fail under heavy load or a DoS attack
The issue with the state engine in a load-balancer is that it is scaled for average Internet traffic, which DNS is not. Each DNS connection (each flow) is typically one UDP packet each way, and well under 1KB of data. By contrast, with most other common protocols (smtp, http, etc.) each flow is hundreds to millions of packets, and probably tens, hundreds or even millions of KB of data. The key metric here is the flows:bandwidth ratio. Devices are built so that when they reach their maximum bandwidth capability, there’s room in memory to track all of the flows. The problem is, they’re typically scaled for average traffic. Since the flows:bandwidth ratio for DNS is so very much higher than other types of traffic, you can expect that a load-balancer in front of busy DNS servers will exhaust their memory in trying to track all the flows long before the maximum bandwidth of the device is reached. To put it another way, by putting a load-balancer scaled for 1Gb of traffic in front of DNS servers scaled for the same amount of traffic, you actually drastically reduce the amount of DNS traffic those servers can handle.
There are better ways.
ISC the maker of BIND has an excellent technote which describes using OSPF ECMP routing to distribute load between a set of DNS servers. In effect, it’s a scheme for doing Anycast on a LAN scale, rather than WAN. Put simply, it involves using Quagga or some other software routing daemon on each DNS server to announce a route to the DNS service address. A wrapper script around the DNS process adds a route just before the process starts, and removes it just after the process exits. The approach works quite well as long as the local router can handle OSPF ECMP, and as long as it uses a route hashing algorithm to maintain a consistent route choice for each source address without needing a state table. For example, the CEF algorithm uses a hash of source address, destination address, and number of available routes to produce a route selection.
The down sides to the ISC method are that there’s a small amount of complexity added to the management of the DNS server itself (for example, you can no longer use the standard application start/stop mechanisms of your OS for the DNS software) and the risk that a failure may occur which causes the DNS software to stop answering queries, but not exit. If the latter occurs, the route to that server will not be removed. This is pretty safe with BIND, as its designed to exit on any critical error, however that’s not necessarily the case with all DNS server applications.
There’s another method available (that I’m going to describe here) which, while being very similar to the ISC methodology, does not have these particular flaws. I should point out here that the method I’m about to describe is not my invention. It was pieced together from the ISC technote and some suggestions that came from Tony Kapella while chatting about this stuff in the hallway at a NANOG meeting a while back. After confirming how easy it is to get this method to work I’ve been singing its praises to anyone who will listen.
At a high level it’s quite similar to the OSPF method. The DNS service address is bound to a clone of the loopback interface on each server, and ECMP routing is used, but rather than populating the routes with OSPF and running routing protocols on the DNS servers, route management is done with static routes on the local router linked to service checks which verify the functionality of the DNS service.
Setting it All Up

Click to view large image
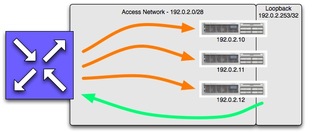
In this example, we’ll use the RFC 3330 TEST-NET. The service address for the DNS service will be 192.0.2.253. This is the address that would be associated with a name server in a delegation for authoritative DNS service, or would be listed as the local recursive DNS server in a DHCP configuration or desktop network config. The network between the local router and the DNS servers will be numbered out of 192.0.2.0/28 (or 192.0.2.0 through 192.0.2.15). The server-facing side of the router will be 192.0.2.1, and that will be the default route for each of the DNS servers, which will be 192.0.2.10, 192.0.2.11 and 192.0.2.12. This network will be the administrative interfaces for the DNS servers.
Once the servers are reachable via their administrative addresses, make a clone of the loopback interface on all three servers. Configure the second loopback interface with the DNS service address.
On FreeBSD, the rc.conf entries for the network should look something like this:
defaultrouter="192.0.2.1"
cloned_interfaces="lo1"
ifconfig_em0="192.0.2.10 netmask 255.255.255.240"
ifconfig_lo1="192.0.2.253 netmask 255.255.255.255"
It’s a little more difficult to represent the configuration under Linux since it’s spread across several config files, but the above should give you a pretty good idea of where to start.
Once the network setup is finished, configure your DNS server software to listen to both the administrative address and the service address. So, on the first DNS server, it should listen to 192.0.2.10 and 192.0.2.253.
That’s all that needs to be done on the servers. Note that doing this was far simpler than configuring the servers to run OSPF and automatically add and remove routes as the DNS service is started or stopped.
The last few steps need to be taken on the local router. The first of these is to configure the router to check up on the DNS service on each of the three servers and make sure it’s running; this is where Cisco’s IP SLA feature comes into play. Configure three service monitors, and then set up three “tracks” which will provide the link to the service monitors.
ip sla monitor 1
type dns target-addr www.example.ca name-server 192.0.2.10
timeout 500
frequency 1
ip sla monitor schedule 1 life forever start-time now
!
ip sla monitor 2
type dns target-addr www.example.ca name-server 192.0.2.11
timeout 500
frequency 1
ip sla monitor schedule 2 life forever start-time now
!
ip sla monitor 3
type dns target-addr www.example.ca name-server 192.0.2.12
timeout 500
frequency 1
ip sla monitor schedule 3 life forever start-time now
!
track 1 rtr 1
track 2 rtr 2
track 3 rtr 3
This sets up three IP SLA Monitors which repeatedly query the administrative address on each server for the A record www.example.ca. The DNS server must respond with an A record for the QNAME you use; if it is unable to respond, or responds with a different record type, the monitor fails. In the example above the monitor attempts the lookup every second (frequency) and fails if it doesn’t receive a valid A record within 500ms (timeout). You may need to experiment with the timeout value, depending on how responsive your DNS servers are. If you find individual servers appear to be going out of service when the daemon is still operating fine you might have the timeout value set too low.
With the monitors in place, turn on CEF and then configure three static routes to the service address via each server’s administrative address. The routes are linked to the service monitors using the track argument:
ip cef
!
ip route 192.0.2.253 255.255.255.255 192.0.2.10 track 1
ip route 192.0.2.253 255.255.255.255 192.0.2.11 track 2
ip route 192.0.2.253 255.255.255.255 192.0.2.12 track 3
And that should be it. DNS queries arriving at the external interface of the router bound for 192.0.2.253 should now be routed to one of the DNS servers behind it, with a fairly equal load distribution. Since the router is using a hashing algorithm to select routes the load distribution can’t be perfect, but in practise I’ve found that it’s incredibly even. The only likely reason to see an imbalance is if your DNS servers receive an unusually high percentage of their queries from just one or two source addresses.
It’s important to point out that most of the cautions in the ISC technote, particularly in reference to zone transfers and TCP DNS, apply equally here. I highly recommend reviewing the ISC document before implementing this in production.
Of course, there is still one big downside to this particular method of load balancing: it’s depedant on one particular vendor. I have not yet found a way to reproduce this configuration using non-Cisco routers. If anyone is aware of a similar feature available from other major routing vendors please let me know and I’ll integrate instructions for those routers here.